
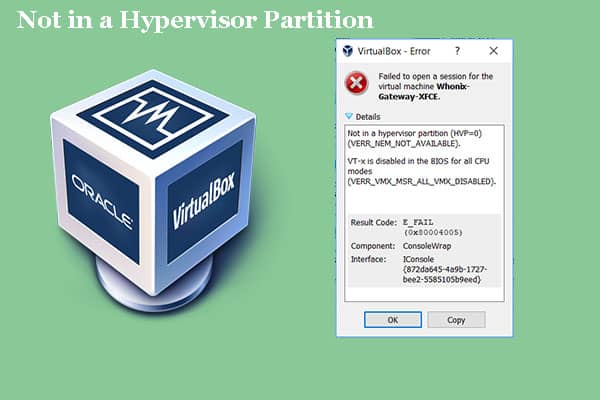
This blog post is about a fix for the not-in-a-hypervisor partition (hvp=0)
(verr_nem_not_available) error. This error occurs when installing VMware ESXi 5.5 on some Dell PowerEdge systems,
such as the R210 II and C-series rack servers. This is not the fix that solves this error by, but no one has a clear answer.
If you get an error reading “ERR: Out of disk space for scratch, please define smaller size [VERR_NEM_NOT_AVAILABLE]” when trying to create a new virtual machine in VirtualBox on Windows 10 or any other Windows version.
Reason:
The following error message indicates that your Windows computer does not support Virtualization: “VT-x is disabled in the BIOS for all CPU modes”.
On a Windows PC, it’s possible to disable Hyper-V, and this needs to be done in advance of setting up a new virtual machine.
I’m trying to figure out a fix for this Dell laptop running Windows 10, but I think the solution would be similar in other computers with minor variations on how they allow Virtualization to be enabled.
Lenovo users read this – How to Enable Virtualization on Lenovo computers
The solution to the above issue includes making a note of the entire solution and then restarting your system. It cannot be followed while reading this article.
Not in a hypervisor partition, It’s worth a try, no matter what.
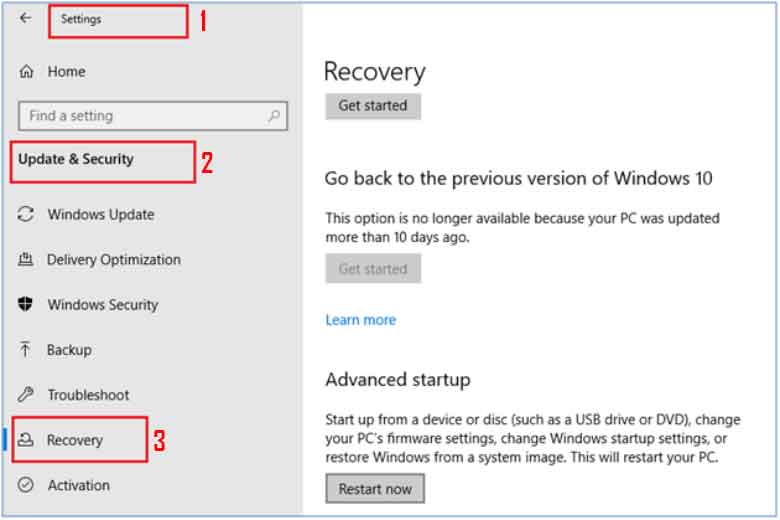
1:
To bypass the error listed above, restart your device and get to Settings -> Update & Security -> Recovery. Click on the blue “Restart Now” button under Advanced startup.
2:
Once you click the restart now option, follow these in order:
Troubleshoot → Advanced options → Restart UEFI Firmware Settings
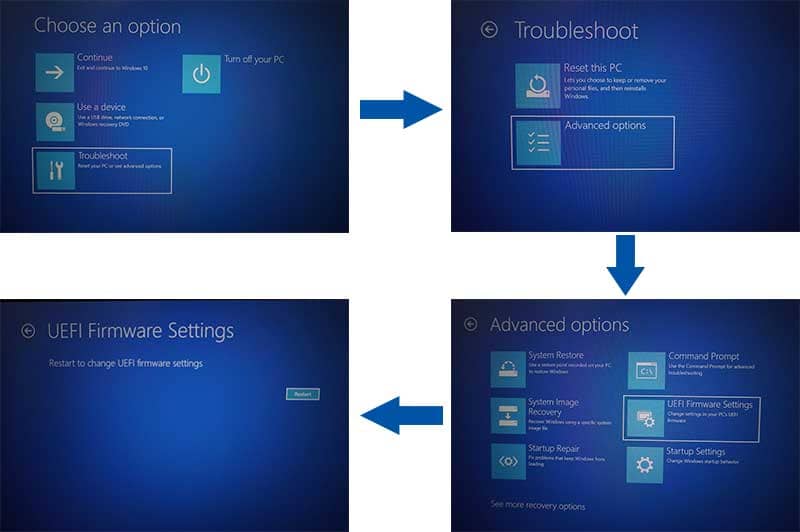
3:
Turning on your laptop may bring you to the BIOS menu screen.
Your computer may need to be set up to support a virtualization environment for us to fix the current issue you’re experiencing.
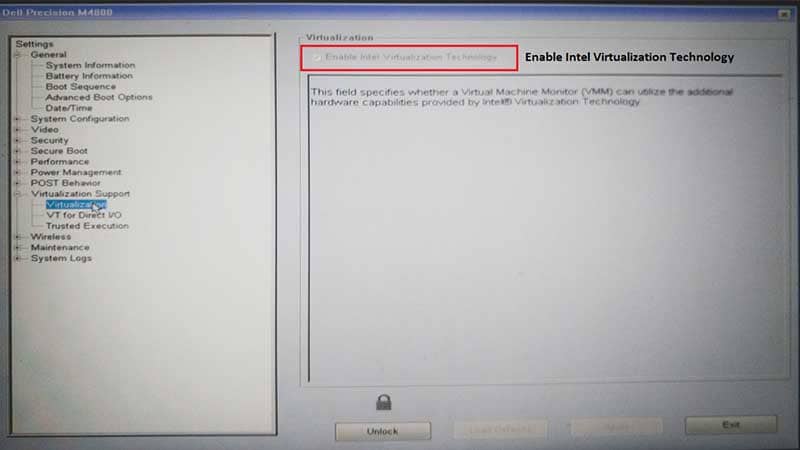
The system shows that Virtualization is disabled Could you change it to set as enabled?
Once finished, click ‘Save’ and then close the program. This method will fix the issue “Not in a hypervisor partition.”
We will also give you three NEW options for fixing it.
Option One:
If you have a Dell F-series server, then the problem might be that it comes with its CD drive. The ESXi installer needs to boot from this disk and try and install it on the local disk. However, because of how legacy BIOSes work,
They tend not to support an option where hard drives are first in the list of bootable devices (odd-numbered).
Put your CD drive into position number two on your device priority order so that it is second in line when you turn on or reboot your system (for some systems, like ours at Proactive IT Solutions.
We need to change our bios settings as well). This should make sure VMware sees these servers correctly and allows installs.
Option Two:
If you’re using ESXi on a system that doesn’t have the option for booting from CD, then it is possible to create a USB key with VMware tools and install ESXI from there.
Insert your USB device into one of your laptop’s or desktop computer’s ports and follow these instructions here: “How-to Create Bootable ESXi Installer” (link below)
Here are some other additional posts about fixing not in a hypervisor partition errors if you want to read more into them as well: “Fix an Error Code 0x40000057 when Launching vSphere Client” or “Fix Error Code Vmware_bootbank_ver r ernem_not_available.”
If you have an ESXi installation already installed, just use VMware to upgrade your system and solve it.
Option Three:
Check for hardware errors by running a diagnostic test on the machine with memtest86+ from here: “How-to Test Memory” (link below) or run SeaTools for Windows to check storage devices.
Events like these are caused by corruption of data within memory that is not being appropriately written to disk and storage media failures such as disks;
this can be due to physical damage or improper formatting. The best thing would be to boot from CD and install VMware tools again, initializing any bad sectors before installing.
Why is vt-x is disabled in the bios for all CPU modes (verr_vmx_msr_all_vmx_disabled). Windows 10?
The following are some probable causes of the error message “VT-x is deactivated in BIOS”:
-
In the BIOS, Virtualization is Disabled
The majority of the time, this problem arises due to the machine’s BIOS level disabling VT-X. Virtualization Technology (VTx) must be activated in the BIOS of a 64-bit host. You may also need to activate Virtualization Technology Directed I/O on some computers (VTd).
-
Your CPU Does not Support VT-X and AMD-V.
There’s also the chance that your CPU is insufficiently powerful to enable virtualization. This can happen with outdated hardware and a dated CPU.
-
VM’s PAE or NX Settings are Incorrect.
According to several customers, the problem was fixed once they verified that the virtualized CPU was set up to work with Physical Adress Extension (PAE) and NX.
-
Third-party Security Software is Obstructing VT-X and VT-D.
Several third-party AV programs have a reputation for interfering with VirtualBox. The conflict can be resolved by creating a rule to uninstall the Av client completely.
-
Attempting to use more than 4 GB of RAM with a 32-bit guest OS
Many customers having the same problem have found a complete resolution by altering the default Base Memory setting.
Some Other Reasons can be-
- Virtualization-based security applications bring on interference.
- The conflict between VirtualBox and Hyper-V or HAXM.
- Issues in Intel HAXM.
